There’s something absolutely magical about Mary Berry’s cake that transforms an ordinary afternoon into something special. I’m Jowel, and after years of baking in my home kitchen, I can honestly say that mastering Mary Berry’s classic Victoria sponge has been one of my most rewarding culinary journeys. The first time I attempted this beloved British classic, I was intimidated by its simplicity – how could something so basic be so perfect? But that’s the genius of Mary Berry’s approach: she takes the fundamentals and elevates them through technique, timing, and a touch of love.
What you’re about to discover isn’t just a recipe; it’s a masterclass in understanding how each ingredient works together to create that perfect, light-as-air sponge that Mary Berry is famous for. I’ve made this cake countless times for family gatherings, birthday celebrations, and those moments when you need something comforting and beautiful. Through trial and error (and yes, a few kitchen disasters), I’ve learned the secrets that make the difference between a good cake and an extraordinary one.
In this comprehensive guide, I’ll walk you through everything I’ve learned about creating Mary Berry’s cake like a true professional. You’ll discover the insider tips that took me years to master, learn how to avoid the common pitfalls that can ruin your baking efforts, and most importantly, gain the confidence to make this stunning cake your own family favorite.🍽️
Featured Recipe ⭐
Mary Berry’s Classic Cake
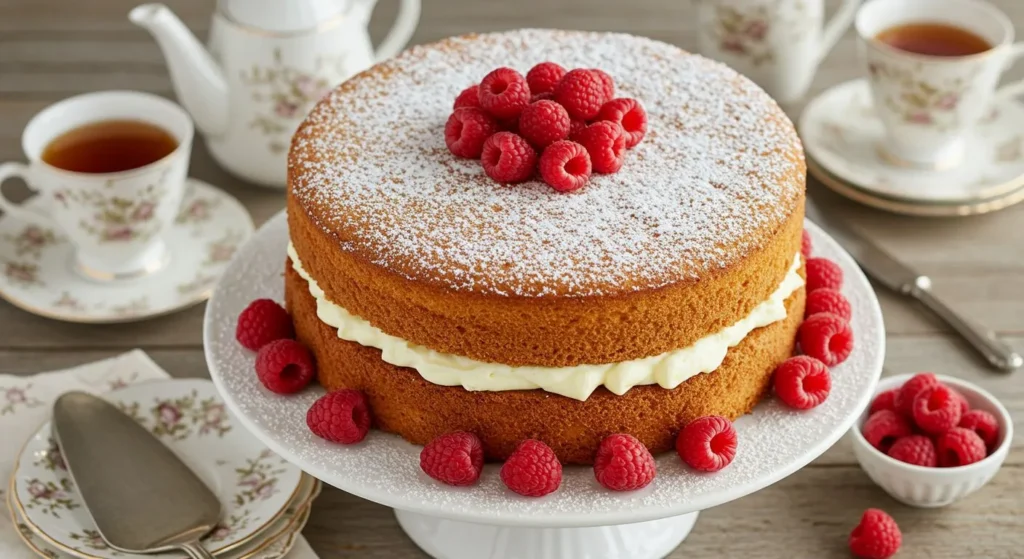
Discover the secret of Mary Berry’s magnificent Victoria sponge – a classic British cake with a light, airy texture and irresistible flavor. A tried-and-tested recipe guaranteed to deliver perfect results for the best homemade cake.
20Prep Time (minutes)
25Baking Time (minutes)
8Servings
385Calories
Ingredients
For the Sponge:
225g soft butter
225g caster sugar
4 large eggs at room temperature
225g self-raising flour
2 tablespoons milk
1 teaspoon vanilla extract
For the Filling:
300ml heavy whipping cream
3-4 tablespoons raspberry jam
Fresh raspberries for decoration
Powdered sugar for dusting
Chef’s Tip
Make sure all ingredients are at room temperature before starting. This ensures better mixing and perfect cake texture. The butter should be soft like mayonnaise.
Instructions
Preheat the oven to 180°C (160°C fan). Grease two 20cm round cake tins with butter and line with baking paper.
Beat butter and sugar together with an electric mixer for 4-5 minutes until the mixture is light in color and fluffy in texture.
Add eggs one at a time, beating well after each addition. If the mixture separates, add a spoonful of flour.
Add the sifted flour gradually in three batches, folding gently. Add milk and vanilla with the final batch.
Divide the mixture evenly between the tins and bake for 20-25 minutes until golden and the cake springs back when pressed.
Leave in tins for 5 minutes then turn out onto a wire rack to cool completely.
Whip cream until it holds its shape, spread jam on bottom layer then cream, place top layer and dust with powdered sugar.
Ingredients: The Foundation of Perfect Mary Berry’s Cake
Key Ingredients and Their Role
The beauty of Mary Berry’s cake lies in its elegant simplicity. After baking this recipe more times than I can count, I’ve come to appreciate how each ingredient plays a crucial role in creating that perfect texture and flavor we all crave.
For the sponge:
225g (8oz) butter, softened to room temperature
225g (8oz) caster sugar
4 large eggs, room temperature
225g (8oz) self-raising flour
2 tablespoons milk
1 teaspoon vanilla extract
For the filling:
300ml (½ pint) double cream
3-4 tablespoons raspberry jam (preferably seedless)
Fresh raspberries for decoration
Icing sugar for dusting
The butter is your foundation – it needs to be perfectly soft, almost like mayonnaise in texture. I learned this the hard way after several dense cakes that refused to rise properly. The caster sugar creates that fine, tender crumb that makes Mary Berry’s cake so special. Unlike granulated sugar, caster sugar dissolves more easily, creating a smoother batter that bakes evenly.
How to Choose High-Quality Ingredients
Over the years, I’ve discovered that ingredient quality makes a noticeable difference in Mary Berry’s cake. For butter, I always choose unsalted varieties from grass-fed cows – the flavor is richer and more complex. When selecting eggs, I look for free-range options with deep golden yolks, as they contribute to both flavor and that beautiful golden color in the finished cake.
The flour choice is critical. Self-raising flour provides the perfect balance of protein and leavening agents. I keep my flour in an airtight container and replace it every few months to ensure maximum freshness. For vanilla extract, invest in pure vanilla rather than artificial – the difference in flavor is remarkable and worth every penny.
Substitutions That Work Well (Tried by Jowel)
Through numerous baking experiments, I’ve found several substitutions that work beautifully in Mary Berry’s cake without compromising the final result. If you’re dairy-free, I’ve successfully used plant-based butter alternatives, though the flavor will be slightly different. For a lighter version, you can substitute half the butter with Greek yogurt – this creates a slightly denser but still delicious cake.
When fresh raspberries aren’t available, I’ve used strawberry jam or even apricot preserves with excellent results. For those avoiding refined sugar, coconut sugar works well, though it will give the cake a slightly caramel flavor and darker color. If you’re out of self-raising flour, combine plain flour with baking powder (1 teaspoon per 125g flour) – I always keep this ratio written on a sticky note in my kitchen!
Preparation Steps: Expert Guidance for Perfect Results
How Jowel Prepares Before Cooking
Success with Mary Berry’s cake begins long before you turn on your oven. I’ve learned that preparation is absolutely everything. First, I bring all my ingredients to room temperature at least two hours before baking – this is non-negotiable. Cold ingredients don’t incorporate well and can lead to a dense, uneven cake.
I preheat my oven to 180°C (160°C fan) and position the rack in the center. While it’s heating, I prepare my cake tins by greasing them thoroughly with butter and lining the bottoms with parchment paper. I even dust the sides with a light coating of flour – this extra step ensures easy release and perfectly smooth sides.
My mise en place is crucial: I measure all ingredients precisely, using a kitchen scale rather than measuring cups for accuracy. I crack my eggs into a separate bowl first (learned this after fishing eggshell pieces out of batter!), and I sift my flour to remove any lumps and add air to the mixture.
Step-by-Step Instructions with Pro Tips
Step 1: Create the Perfect Creamed Mixture In a large mixing bowl, cream the softened butter and caster sugar together using an electric mixer on medium speed for 4-5 minutes. This is where patience pays off – the mixture should be pale, light, and fluffy, almost white in color. I know it’s ready when I can see the texture has completely transformed from dense to airy.
Pro tip from my kitchen: If your butter wasn’t soft enough initially, don’t try to rush this step. Under-creamed butter and sugar will result in a dense cake that won’t rise properly.
Step 2: Incorporate Eggs Gradually Add eggs one at a time, beating well after each addition. This prevents the mixture from curdling. If it does start to separate (and trust me, it happens to everyone), add a tablespoon of flour and continue mixing.
Pro tip: I always crack each egg into a small bowl first, then add it to the mixture. Room temperature eggs incorporate much more easily than cold ones.
Step 3: Fold in Flour with Care Using a large metal spoon or spatula, gently fold in the sifted flour in three additions. The key word here is “gently” – overmixing develops the gluten and creates a tough cake. Add the milk and vanilla with the final addition of flour.
Pro tip: I use a figure-eight motion when folding, lifting the mixture from the bottom and folding it over the top. This preserves the air we worked so hard to incorporate.
Step 4: Divide and Bake Divide the mixture evenly between your prepared tins. I use kitchen scales to ensure even distribution – each tin should have approximately 340g of mixture. Level the tops gently with a palette knife.
Bake for 20-25 minutes until the cakes are golden brown and spring back when lightly touched in the center. They should also start pulling away slightly from the sides of the tin.
Step 5: Cool Properly Leave the cakes in their tins for 5 minutes before turning out onto wire racks. This prevents breaking while ensuring they don’t become soggy from steam.
Common Mistakes to Avoid (From Jowel’s Real Trials)
After years of making Mary Berry’s cake, I’ve made every mistake in the book – so you don’t have to! The most common error I see (and experienced myself) is rushing the creaming process. That pale, fluffy texture isn’t just for show – it’s creating the structure that makes the cake light and tender.
Another frequent mistake is opening the oven door too early. I learned this lesson when several of my early attempts collapsed dramatically. The cake needs at least 15 minutes of undisturbed baking time to set its structure. When you do check, open the door gently and briefly.
Temperature issues plague many home bakers. If your kitchen is particularly warm, your butter might become too soft, leading to a greasy batter that doesn’t hold air well. Conversely, if ingredients are too cold, they won’t combine properly, resulting in a dense texture.
Serving & Final Touches
Beautiful and Creative Presentation Ideas
The assembly of Mary Berry’s cake is where your artistic flair can shine. I’ve found that presentation makes all the difference between a homemade cake and a professional-looking masterpiece. Start by selecting your best-looking layer for the top – save any that have minor imperfections for the bottom.
For the classic filling, I whip double cream to soft peaks (not stiff – that’s another lesson learned through experience). Spread a generous layer of raspberry jam on the bottom layer, staying about 1cm from the edges. Top with the whipped cream, again leaving a border for spreading when you add the top layer.
When placing the second layer, press down gently and evenly. The cream and jam should come just to the edges without spilling over. For that professional finish, I dust the top with icing sugar using a fine sieve – the contrast against the golden sponge is simply beautiful.
Creative variations I love:
Fresh berries arranged on top before dusting with icing sugar
A drizzle of melted white chocolate for special occasions
Lemon curd instead of jam for a citrusy twist
A ring of fresh flowers around the base for garden parties
Best Sides and Pairings (Family-Tested)
Through countless family gatherings, I’ve discovered that Mary Berry’s cake pairs beautifully with afternoon tea classics. Earl Grey tea complements the vanilla and raspberry flavors perfectly, while a robust English Breakfast tea provides a nice contrast to the sweetness.
For special occasions, I serve it with fresh berries and a small glass of Prosecco. The bubbles cleanse the palate between bites, making each forkful as delicious as the first. Children in my family love it with a glass of cold milk, while adults often appreciate it with a cup of freshly brewed coffee.
During summer gatherings, I’ve found that serving thin slices alongside fresh strawberries and a small dollop of clotted cream creates an elegant dessert that feels both traditional and special.
Storing and Reheating Leftovers Safely
Proper storage is crucial for maintaining the quality of Mary Berry’s cake. If you’re planning to serve it the same day, store it covered at room temperature. For longer storage, I wrap individual slices in plastic wrap and refrigerate for up to three days.
The filled cake should be stored in the refrigerator due to the fresh cream. I’ve learned to bring it to room temperature for 30 minutes before serving to restore the perfect texture. For unfilled sponges, they actually improve after a day, becoming more moist and flavorful.
Freezing works beautifully for the unfilled sponges – wrap them individually in plastic wrap and foil, then freeze for up to three months. Thaw overnight at room temperature before filling and serving.
For more amazing recipes, be sure to check out our other sections to explore a variety of ideas that will enrich your cooking experience. Each section offers its own unique flavors to ensure a delightful culinary journey:
Easy and Quick Recipes: A collection of dishes that guarantee delicious meals with minimal effort and time.
Healthy Recipes: Discover healthy and delicious options that fit your lifestyle.
Desserts: A diverse selection of sweets that will add a special touch of sweetness to your table.
Lunch Recipes: Tasty lunch ideas that you can easily prepare to delight your family.
Dinner Recipes: Delicious and easy-to-make recipes that will make your dinner a memorable occasion.
Frequently Asked Questions
1. Can I prepare Mary Berry’s cake in advance? Absolutely! I often bake the sponges a day ahead, which actually improves their texture. Store them wrapped at room temperature, then fill on the day of serving. The unfilled sponges can be frozen for up to three months. However, once filled with cream, the cake should be served within 24 hours for best quality.
2. What’s the best way to store leftover Mary Berry’s cake? Cover the cake and store it in the refrigerator for up to three days. The cream filling requires cold storage, but bring the cake to room temperature 30 minutes before serving for the best texture. I’ve found that individual slices wrapped in plastic wrap maintain their moisture better than leaving the whole cake uncovered.
3. How can I make Mary Berry’s cake healthier? I’ve successfully reduced the sugar by 25% without significantly affecting the texture, though the cake will be less sweet. You can substitute half the butter with Greek yogurt for a lighter version, or use whole wheat self-raising flour for added fiber. Fresh fruit instead of jam reduces sugar content while adding natural sweetness and vitamins.
4. Can I double the ingredients for a party? Yes, but I recommend making two separate batches rather than doubling in one bowl. Large quantities are harder to mix evenly, and most home mixers struggle with double batches. I’ve learned this creates more consistent results and ensures proper creaming of the butter and sugar.
5. What’s the biggest mistake people make with Mary Berry’s cake? The most common error I see is rushing the creaming process or using cold ingredients. Room temperature ingredients incorporate much better, and proper creaming (4-5 minutes until pale and fluffy) is essential for the light texture. Also, opening the oven door too early can cause the cake to collapse – patience is key!
Conclusion
Making Mary Berry’s cake like a professional isn’t about complicated techniques or expensive equipment – it’s about understanding the fundamentals and applying them with care and attention. Through my years of baking this beloved recipe, I’ve learned that success comes from respecting each ingredient, following the process with patience, and not being afraid to learn from mistakes.
This cake has become more than just a dessert in my home; it’s a symbol of celebration, comfort, and the joy of sharing something made with love. Whether you’re baking for a special occasion or simply treating your family to something wonderful, Mary Berry’s cake delivers every single time.
I encourage you to try this recipe and make it your own. Don’t worry if your first attempt isn’t perfect – mine certainly wasn’t! Each time you bake it, you’ll learn something new and get closer to that ideal texture and flavor. Please share your results in the comments below, and don’t hesitate to ask questions. I love hearing about your baking adventures and successes!
Remember, the best recipes are those shared with others. Tag your friends, share this guide, and spread the joy of homemade baking. Happy baking