Table of Contents
There’s something magical about the combination of orange and vanilla that instantly transports you back to those carefree summer days, chasing the ice cream truck and savoring that perfect orange creamsicle. As a home cook with years of experience perfecting family favorite recipes, I’ve discovered that this Orange Creamsicle Cake captures that exact same nostalgic joy in every single bite.
I’ll never forget the first time I made this cake for my family’s Fourth of July gathering. The adults were reminiscing about their childhood summers while the kids were discovering this flavor combination for the first time. What struck me most was how this simple dessert brought three generations together around one table, all sharing the same delighted expressions. That’s when I knew I had stumbled upon something truly special.
This easy homemade recipe combines the bright, citrusy flavor of orange with the creamy sweetness of vanilla in a way that’s both sophisticated enough for dinner parties and simple enough for weeknight treats. Throughout this article, I’ll share everything I’ve learned about creating the perfect Orange Creamsicle Cake, from ingredient selection to storage tips, plus all the little secrets that make this dessert absolutely irresistible.

Orange Creamsicle Cake
A moist, vibrant Orange Creamsicle Cake that blends bright citrusy cake with creamy vanilla frosting — perfect for nostalgic summer gatherings or weeknight treats.
Ingredients
Instructions
- 1Preheat the oven to 350°F (175°C) and grease a 9×13 inch baking dish with butter and flour.
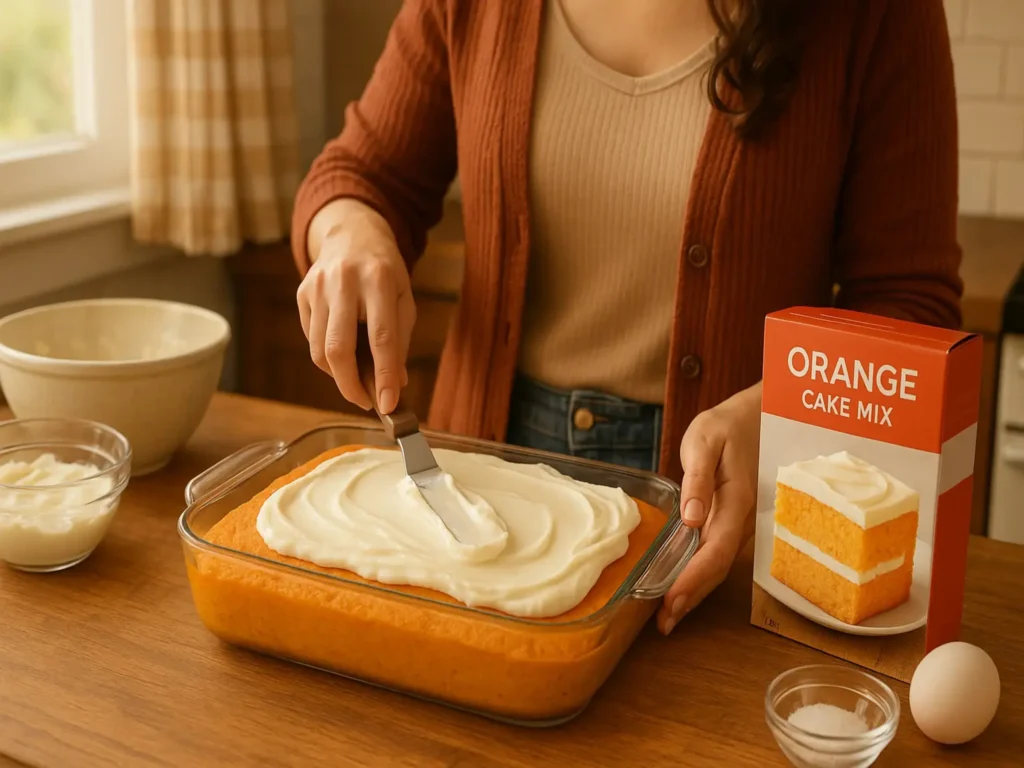
- 2In a large mixing bowl, combine the orange cake mix, orange soda, vegetable oil, and eggs. Mix just until smooth, about 2 minutes on medium speed.
- 3Pour the batter into the prepared pan and spread evenly. Bake for 25–30 minutes, or until a toothpick inserted comes out clean.
- 4Let the cake cool completely, at least 2 hours, before frosting.
- 5In a bowl, whisk together the vanilla pudding mix and cold milk until thickened. Fold in the thawed Cool Whip until fully combined.
- 6Spread the frosting evenly over the cooled cake. Refrigerate for at least 1 hour before serving.
Ingredients: The Foundation of Your Perfect Orange Creamsicle Cake
After making this cake dozens of times and experimenting with various brands and substitutions, I’ve learned that the quality of your ingredients directly impacts the final result. Let me walk you through each component and share the insights I’ve gathered from my years in the kitchen.
Key Ingredients and Their Essential Roles
For the Cake Base:
- 1 box orange cake mix
- 1 can (12 oz) orange soda
- 1/3 cup vegetable oil
- 3 large eggs
For the Creamy Frosting:
- 1 box (3.4 oz) vanilla instant pudding mix
- 1 cup cold milk
- 1 container (8 oz) Cool Whip, thawed
The orange cake mix serves as our foundation, providing that bright citrus flavor that’s essential to the creamsicle experience. The orange soda isn’t just a quirky addition—it’s what makes this cake incredibly moist while intensifying the orange flavor without making it too sweet. I’ve found that using a high-quality orange soda makes a noticeable difference in the final taste.
The vanilla instant pudding mix in the frosting is what creates that authentic creamsicle flavor profile. It provides the creamy, smooth texture that mimics the vanilla ice cream center of the classic popsicle, while the Cool Whip adds that light, airy consistency that makes each bite feel like a cloud.
Choosing High-Quality Ingredients for Maximum Flavor
Through trial and error, I’ve discovered that not all ingredients are created equal. For the orange cake mix, I prefer brands that use real citrus oils rather than artificial flavoring—you can usually tell by reading the ingredient list. The difference in taste is remarkable.
When selecting your orange soda, choose one with a clean, bright orange flavor. I’ve tested this recipe with various brands, and those with high fructose corn syrup tend to create a slightly different texture than those made with cane sugar. Both work beautifully, but the flavor profiles vary subtly.
For the eggs, always use large eggs at room temperature. This ensures better mixing and a more uniform cake texture. If you forget to take them out ahead of time, place them in a bowl of warm water for 5-10 minutes—a trick I learned from my grandmother.
Substitutions That Actually Work (Tested in My Kitchen)
Over the years, I’ve had to make this cake with various substitutions due to dietary restrictions, ingredient availability, or simply running out of something at the last minute. Here are the modifications I’ve tested that maintain the integrity of the recipe:
Cake Mix Alternatives: If you can’t find orange cake mix, you can use yellow cake mix and add 2 tablespoons of orange zest plus 1 teaspoon of orange extract. The flavor won’t be quite as intense, but it’s still delicious.
Orange Soda Substitutions: In a pinch, you can use 1 cup of orange juice mixed with 1/2 cup of lemon-lime soda. The carbonation helps create the same light texture.
Cool Whip Alternatives: For a more natural approach, you can substitute with 1 cup of heavy cream whipped to stiff peaks, though the texture will be slightly different—more like a traditional buttercream.
Dairy-Free Options: I’ve successfully made this using oat milk in place of regular milk and coconut whipped cream instead of Cool Whip for friends with dairy sensitivities.
Preparation Steps: Expert Guidance for Perfect Results
The beauty of this Orange Creamsicle Cake lies in its simplicity, but there are several techniques I’ve refined over the years that ensure consistent, restaurant-quality results every time.
How I Prepare Before Cooking
Preparation is everything when it comes to baking success. I always start by preheating my oven to 350°F and greasing my 9×13 inch baking dish thoroughly. I use a combination of butter and flour, making sure to get into all the corners—this prevents any sticking issues that could ruin your beautiful cake.
I like to measure all my ingredients beforehand and have them at room temperature. This includes taking the eggs out of the refrigerator about 30 minutes before baking and ensuring the Cool Whip is properly thawed. Room temperature ingredients mix more easily and create a smoother batter.
One trick I’ve learned is to give the orange soda a gentle stir before using it. Sometimes the flavoring settles, and you want that orange taste distributed evenly throughout your cake.
Step-by-Step Instructions with Professional Tips
Step 1: Creating the Perfect Batter In a large mixing bowl, combine the orange cake mix, orange soda, vegetable oil, and eggs. Here’s where my experience really comes into play: mix until the ingredients are just combined and the batter is smooth, but don’t overmix. Overmixing develops the gluten in the flour, resulting in a tough, dense cake instead of the light, fluffy texture we’re after.
I use a hand mixer on medium speed for about 2 minutes, stopping to scrape down the sides of the bowl halfway through. The batter should be smooth but not overworked.
Step 2: Baking to Perfection Pour the batter into your prepared pan, using a spatula to spread it evenly. This ensures uniform baking and prevents one side from being thicker than the other.
Bake for 25-30 minutes, but start checking at the 25-minute mark. I’ve learned that ovens can vary significantly, and overbaked cake is one of the most common issues I see. The cake is done when a toothpick inserted in the center comes out clean or with just a few moist crumbs.
Step 3: The Critical Cooling Phase This is where patience pays off. Let the cake cool completely before adding the frosting. I cannot stress this enough—warm cake will melt the frosting and create a soggy mess. I usually let it cool for at least 2 hours, sometimes even overnight if I’m preparing ahead.
Step 4: Creating the Signature Frosting While the cake cools, prepare your frosting. Whisk the vanilla pudding mix with cold milk until it thickens, which usually takes about 2 minutes of vigorous whisking. The mixture should be smooth and free of lumps.
Gently fold in the thawed Cool Whip using a rubber spatula. The key word here is “fold”—don’t stir or mix aggressively, as this can deflate the Cool Whip and make your frosting dense.
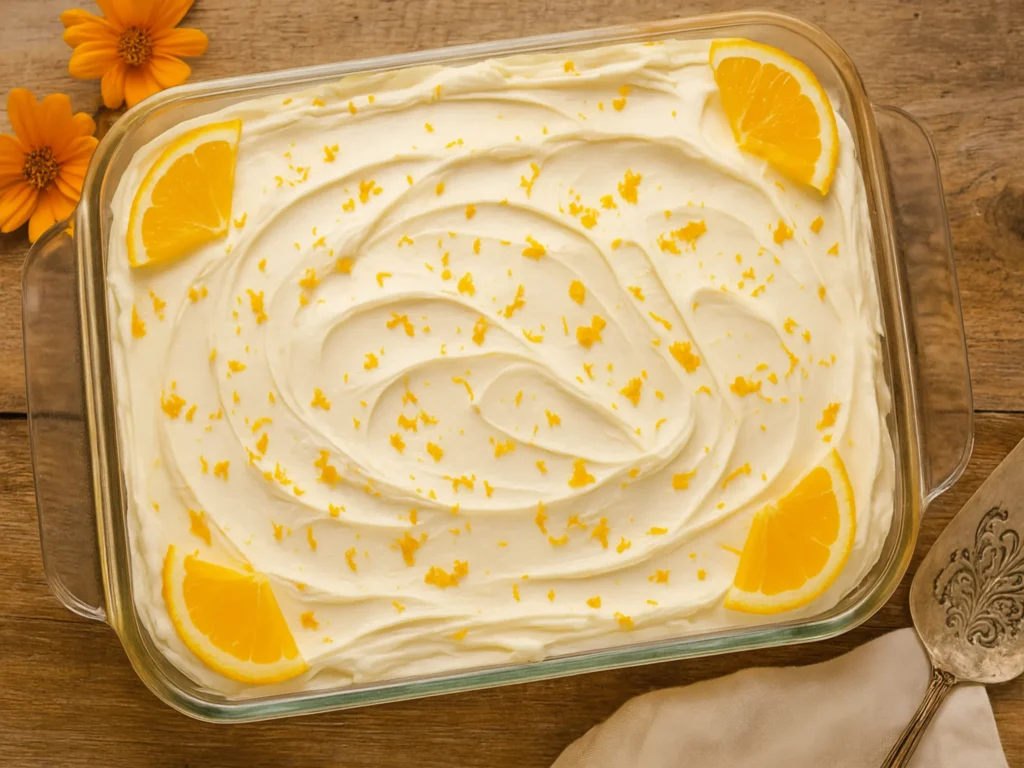
Step 5: Assembly and Final Touches Spread the frosting evenly over the cooled cake using an offset spatula. I like to create gentle swirls in the frosting for a more professional appearance. Refrigerate for at least 1 hour before serving to allow the flavors to meld and the frosting to set properly.
Common Mistakes to Avoid (From My Real Kitchen Trials)
Through my years of making this cake, I’ve encountered nearly every possible mistake, and I want to help you avoid them:
The Warm Cake Disaster: Adding frosting to a warm cake is the quickest way to ruin this dessert. The frosting will melt and absorb into the cake, creating a soggy texture.
Overmixing the Batter: This creates a tough, dense cake that’s nothing like the light, fluffy texture you want.
Using Flat Soda: Make sure your orange soda still has carbonation. The bubbles help create the cake’s tender crumb.
Skipping the Chilling Time: The cake really does need that hour in the refrigerator to reach its full potential. The flavors need time to meld, and the frosting needs time to set.
Serving & Final Touches: Making Your Orange Creamsicle Cake Shine
The presentation of your Orange Creamsicle Cake can elevate it from a simple dessert to a show-stopping centerpiece. After years of serving this at various gatherings, I’ve developed some favorite techniques for making it truly special.
Beautiful and Creative Presentation Ideas

Classic Elegance: Sometimes simple is best. I love garnishing each slice with a twist of fresh orange zest and a small mint leaf. The bright green against the orange and white creates a beautiful color contrast that screams “fresh and citrusy.”
Childhood Nostalgia: For a fun, playful presentation, I sometimes crumble actual orange creamsicle popsicles over the top. It’s whimsical and immediately communicates what the cake tastes like.
Summer Party Style: For outdoor gatherings, I like to serve this cake on a colorful platter surrounded by fresh orange slices and berries. The natural colors complement the cake beautifully and add a fresh, summery feel.
Individual Servings: For more formal occasions, I sometimes cut the cake into squares and serve them in small glass bowls, topped with a dollop of whipped cream and a candied orange peel.
Best Sides and Pairings (Family-Tested Combinations)
This Orange Creamsicle Cake is delicious on its own, but I’ve discovered some pairings that truly enhance the experience:
Beverages: Cold milk is classic, but I also love serving this with iced tea, lemonade, or even a light sparkling water with a splash of orange juice. For adult gatherings, a crisp white wine or champagne pairs beautifully.
Fresh Fruit: Fresh berries, particularly strawberries and blueberries, provide a lovely tartness that balances the sweetness of the cake. I often create a simple mixed berry compote to serve alongside.
Coffee Service: This cake is surprisingly wonderful with coffee. The citrus notes complement a medium roast beautifully, making it perfect for afternoon gatherings or brunch.
Storing and Reheating Leftovers Safely
Proper storage is crucial for maintaining the cake’s texture and flavor. I always store leftover Orange Creamsicle Cake covered in the refrigerator, where it will stay fresh for up to 5 days. The Cool Whip frosting contains dairy, so room temperature storage isn’t safe.
For longer storage, individual slices can be wrapped tightly in plastic wrap and frozen for up to 3 months. I’ve found that the texture holds up remarkably well to freezing, though I recommend thawing in the refrigerator overnight rather than at room temperature.
One important note: this cake is best served cold, so there’s no need to bring it to room temperature before serving leftovers. The chilled temperature actually enhances the creamsicle experience.
 DINNER
  LUNCH
LUNCH  CAKE
CAKE  BREAKFAST
 For more amazing recipes, be sure to check out our other sections to explore a variety of ideas that will enrich your cooking experience. Each section offers its own unique flavors to ensure a delightful culinary journey:
- Easy and Quick Recipes: A collection of dishes that guarantee delicious meals with minimal effort and time.
- Healthy Recipes: Discover healthy and delicious options that fit your lifestyle.
- Desserts: A diverse selection of sweets that will add a special touch of sweetness to your table.
- Lunch Recipes: Tasty lunch ideas that you can easily prepare to delight your family.
- Dinner Recipes: Delicious and easy-to-make recipes that will make your dinner a memorable occasion.
Frequently Asked Questions: Your Orange Creamsicle Cake Concerns Addressed
Can I prepare this Orange Creamsicle Cake in advance?
Absolutely! In fact, this cake actually improves with time. I often make it the day before serving, as the flavors have more time to meld together. The cake can be baked and frosted up to 2 days ahead of time. Just keep it covered and refrigerated. I’ve found that the texture and flavor are at their peak after about 24 hours.
For longer advance preparation, you can bake the cake up to a week ahead and freeze it (unfrosted). Wrap it tightly in plastic wrap and aluminum foil. When ready to serve, thaw in the refrigerator overnight and add the frosting the day you plan to serve it.
What’s the best way to store leftovers?
This cake must be stored in the refrigerator due to the dairy in the frosting. I cover it tightly with plastic wrap or transfer individual slices to airtight containers. It will stay fresh for up to 5 days. I’ve learned that placing a piece of parchment paper directly on the frosting before covering helps prevent condensation from forming on the surface.
For portion control (or to have single servings ready for packed lunches), I often cut the entire cake into squares and store them in individual containers. This makes it easy to grab a slice whenever the craving strikes.
How can I make this Orange Creamsicle Cake healthier?
Over the years, I’ve experimented with several lighter versions of this recipe. You can reduce calories by using sugar-free cake mix, diet orange soda, and sugar-free pudding mix. Light Cool Whip can replace the regular version. These substitutions reduce the calories by about 30% while maintaining much of the original flavor and texture.
For a more natural approach, I’ve had success replacing the Cool Whip with whipped coconut cream (from a chilled can of full-fat coconut milk). The flavor is slightly different but still delicious, and it adds healthy fats while reducing processed ingredients.
Can I double the ingredients for a party?
Yes, but with some important considerations. I’ve successfully doubled this recipe many times for larger gatherings. You’ll need two 9×13 inch pans or one very large sheet pan. The baking time remains roughly the same—don’t increase it just because you’re making more cake.
For the frosting, doubling works perfectly. In fact, I find that having a little extra frosting is never a bad thing. Just make sure you have adequate refrigerator space for chilling the larger quantity.
What’s the biggest mistake people make with this recipe?
The most common mistake I see is not allowing the cake to cool completely before frosting. I cannot emphasize this enough—warm cake will melt the frosting, creating a soggy, unappetizing mess. I always recommend cooling for at least 2 hours, or even overnight if you’re preparing ahead.
The second biggest mistake is overmixing the batter. This develops the gluten too much, resulting in a tough, dense cake instead of the light, fluffy texture that makes this dessert so special. Mix just until combined—a few small lumps are perfectly fine.
Conclusion: Your Journey to Orange Creamsicle Perfection
This Orange Creamsicle Cake has become more than just a recipe in my kitchen—it’s a gateway to joy, nostalgia, and connection. Whether you’re looking to surprise your family with a special treat, bring something memorable to a potluck, or simply satisfy your own craving for something sweet and citrusy, this cake delivers every single time.
The beauty of this recipe lies not just in its incredible flavor, but in its simplicity and reliability. With just a few basic ingredients and some tried-and-true techniques, you can create a dessert that rivals anything from a professional bakery. The combination of moist, flavorful cake and light, creamy frosting creates a perfect balance that appeals to both kids and adults.
I encourage you to make this cake your own. Try different garnishes, experiment with the presentation, or even add your own creative touches. Cooking is about expressing yourself and creating memories, and this Orange Creamsicle Cake provides the perfect canvas for both.
I’d love to hear about your experience making this recipe! Leave a comment below sharing how your cake turned out, any modifications you made, or how your family reacted to this nostalgic treat. Did it transport you back to childhood summers? Did you discover any new tricks or tips? Your feedback helps me continue improving and sharing these easy homemade recipes that bring families together.
Don’t forget to share photos of your finished cake on social media—there’s nothing quite like seeing the joy on someone’s face when they take that first bite of this magical dessert. Happy baking!